# Modules

# Introduction

The chapter focuses strictly on the development section. For administrative information check out an [administration tutorial](https://docs.intalioservices.com/books/customer-panel---installation-and-administrators-guide "Customer Panel - Installation and Administrator's Guide").

#### Main assumptions

The customer panel comes with an easy way of developing and deploying new modules to the panel. It provides you an out-of-the-box configuration with a few steps needed for proper running.

# System Configuration

#### XML Configuration File

Configuration determines the main aspects of the module. Each one regardless of future different configurations has the same core model:

```XML
 <?xml version="1.0" encoding="UTF-8" ?>
<otrs_config version="2.0" init="Application">  
	<Setting Name="OTRSFrontendModule::<NAVIGATION_NAME>" Required="0" Valid="0">
        <Description Translatable="1">Module random description</Description>
        <Navigation>CustomerFrontend</Navigation>
        <Value>
            <Hash>
                <Item Key="id">LatestActivity</Item>
                <Item Key="type">[module/redirect/hidden]</Item>
                <Item Key="text">Latest Activity</Item>
                <Item Key="to">/module/LatestActivity</Item>
                <Item Key="icon">timeline</Item>
                <Item Key="priority">110</Item>
                <!--OPTIONAL-->
                <Item Key="mode">[newWindow/tab]</Item>
                <Item ValueType="Textarea" Key="widgets">
                    [
                        {
                        "props": {
                        },
                        "id": "5",
                        "widgetFile": "WIDGET_Timeline.js",
                        "compiled": false,
                        "view" : "Dashboard",
                        "slot" : "slot3",
                        "name": "Latest Activity"
                      }
                    ]
                </Item>
            </Hash>
        </Value>
    </Setting>
</otrs_config>  
```

`<Hash>` specifies main configurations settings:

- <span style="color: #993300;">***&lt;id&gt;***</span>  
    <span style="color: #000000;">An **identification key** for your module. Should be unique for every module**.**</span>
- <span style="color: #993300;">***&lt;type&gt;*** <span style="color: #000000;">Determines the type of the module. For further information check out [the administration guide for modules](https://docs.intalioservices.com/books/customer-panel---installation-and-administrators-guide/page/modules "Modules").</span></span>
- <span style="color: #993300;">***&lt;text&gt;*** </span><span style="color: #000000;">Display label for frontend panel.</span>
- <span style="color: #993300;">**&lt;to&gt;**  
    <span style="color: #000000;">Specify the URL path to the module. If redirect was chosen as a type this field specifies redirection link.</span></span>
- <span style="color: #993300;">***&lt;icon&gt;*** <span style="color: #000000;">Specify the name of the icon to display. Available icons can be found in this [icon library](https://material.io/resources/icons/?style=baseline "Material Design Icons").</span></span>
- <span style="color: #993300;">***&lt;priority&gt;*** <span style="color: #000000;">The higher the priority the higher the module is on the menu. </span></span>
- <span style="color: #993300;">***&lt;widgets&gt;*** <span style="color: #000000;">Set an array of **widget configurations** that should be placed in the module. More on widget configuration [here](https://docs.intalioservices.com/books/customer-panel---developer-guide/page/xml-configuration "Widget XML Configuration").</span></span>
- <span style="color: #000000;">**\[Optional\]** </span><span style="color: #993300;">***&lt;mode&gt;*** <span style="color: #000000;">Active if type set to **redirect**. Specifies the way in which the system will display the redirection page.   
    </span></span><span style="color: #993300;"><span style="color: #000000;">Available options are:</span></span><span style="color: #993300;">  
    **<span style="color: #000000;">- </span>**<span style="color: #000000;">*newWindow*</span>  
    **<span style="color: #000000;">- </span>**<span style="color: #000000;">*tab*</span></span>

#### <span style="color: #000000;">Available modules</span>

<span style="color: #000000;">Another step is to include a module name in the `CustomerOTRSFrontendModule::AvailableModules` in system configuration.</span>

<span style="color: #000000;">[![include_module.png](https://docs.intalioservices.com/uploads/images/gallery/2020-08/scaled-1680-/YjrpuKM7YjxHeETQ-include_module.png)](https://docs.intalioservices.com/uploads/images/gallery/2020-08/YjrpuKM7YjxHeETQ-include_module.png)</span>

<p class="callout warning align-left"><span style="color: #000000;">It's important to pass the module's **id** as a configuration key.</span></p>

#### <span style="color: #000000;">Permissions</span>

<span style="color: #000000;">The last step is to set visibility of the module for predefined CustomerUser groups in the `CustomerOTRSFrontendModule::Permissions`</span>

[![permission.png](https://docs.intalioservices.com/uploads/images/gallery/2020-08/scaled-1680-/uBgDKZJi5qC5FEoa-permission.png)
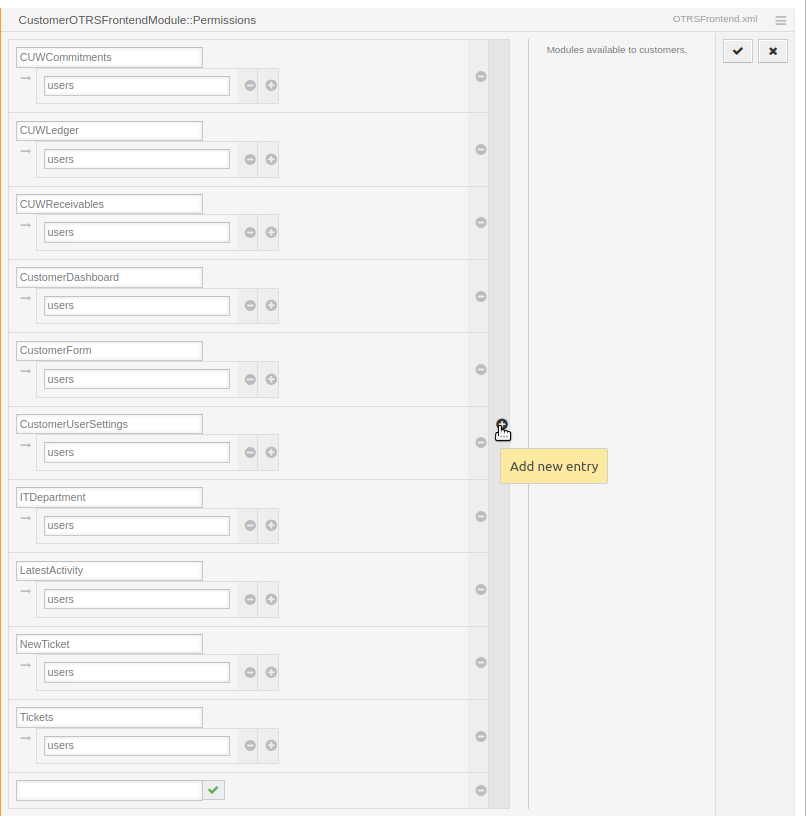
](https://docs.intalioservices.com/uploads/images/gallery/2020-08/uBgDKZJi5qC5FEoa-permission.png)

<p class="callout info">If your module is not visible in the menu try to initiate the configuration rebuild from within the OTRS console.  
1. Login on your server using SSH  
2. Change user to otrs  
3. Run config rebuild command -&gt; `/opt/otrs/bin/otrs.Console.pl Maint::Config::Rebuild`</p>

<p class="callout success">After completion of these three steps, your module is ready to go!</p>